Install Python, Django, and the Plivo Python SDK
You must set up and install Python, Django, and Plivo’s Python SDK before you make your first call.Install Python
Download and install Python from its official site.Install Django and the Plivo Python SDK
Create a projects directory and change into it.$ mkdir mydjangoapps
$ cd mydjangoapps
$ pip install django plivo
Make your first outbound call
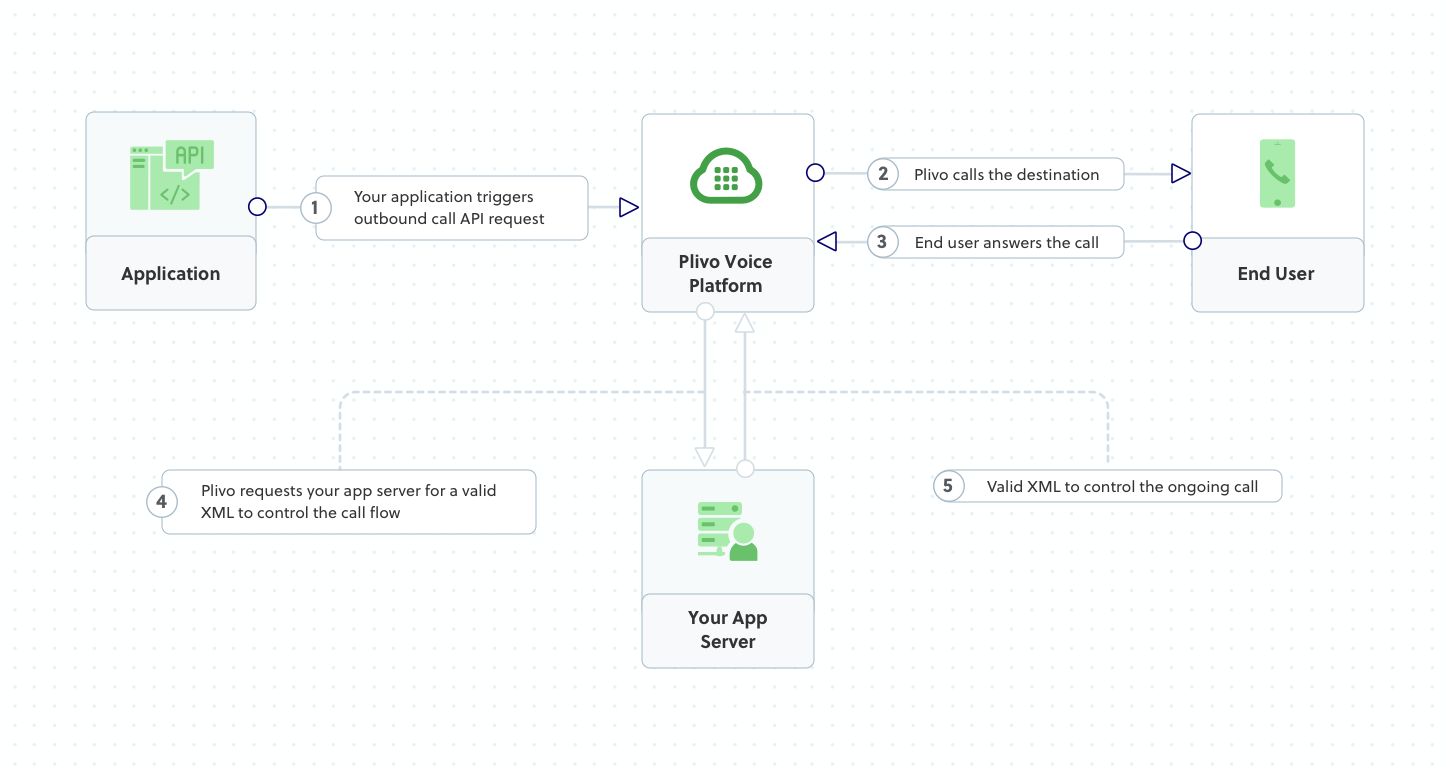
Plivo requests an answer URL when the call is answered (step 4) and expects the file at that address to hold a valid XML response from the application with instructions on how to handle the call. To see how this works, you can use https://s3.amazonaws.com/static.plivo.com/answer.xml as an answer URL to test your first outgoing call. The file contains this XML code:<Response>
<Speak>Congratulations! You've made your first outbound call!</Speak>
</Response>
Create a Django project
Use django-admin to auto-generate code for a Django project.$ django-admin startproject VoiceProj
Create a Django app for outbound calls
Change to the new directory and create a Django app for outbound calls.$ python manage.py startapp outboundcall
outboundcall/views.py and paste into it this code.from django.conf import settings
from django.http import HttpResponse
from django.views.decorators.csrf import csrf_exempt
import plivo
@csrf_exempt
def outboundcall_response(request):
client = plivo.RestClient(settings.<auth_id>, settings.<auth_token>)
response = client.calls.create(
from_=settings.<caller_id>,
to_='<destination_number>',
answer_url='https://s3.amazonaws.com/static.plivo.com/answer.xml',
answer_method='GET', )
return HttpResponse(response)
Note:
We recommend that you store your credentials in the auth_id and auth_token environment variables to avoid the possibility of accidentally committing them to source control. If you do this, you can initialize the client with no arguments and Plivo will automatically fetch the values from the environment variables. You can use os.environ to store environment variables and retrieve them when initializing the client.
Add a route
Create the file outboundcall/urls.py and paste into it this code.from django.conf.urls import url
from . import views
urlpatterns = [
url(r'^$', views.outboundcall_response, name='outboundcall'),
]
VoiceProj/urls.py and paste into it this code.from django.conf.urls import include, url
from django.contrib import admin
urlpatterns = [
url(r'^outboundcall/', include('outboundcall.urls')),
url(r'^admin/', admin.site.urls),
]
Test
Run your code.$ python manage.py runserver
Receive your first inbound call
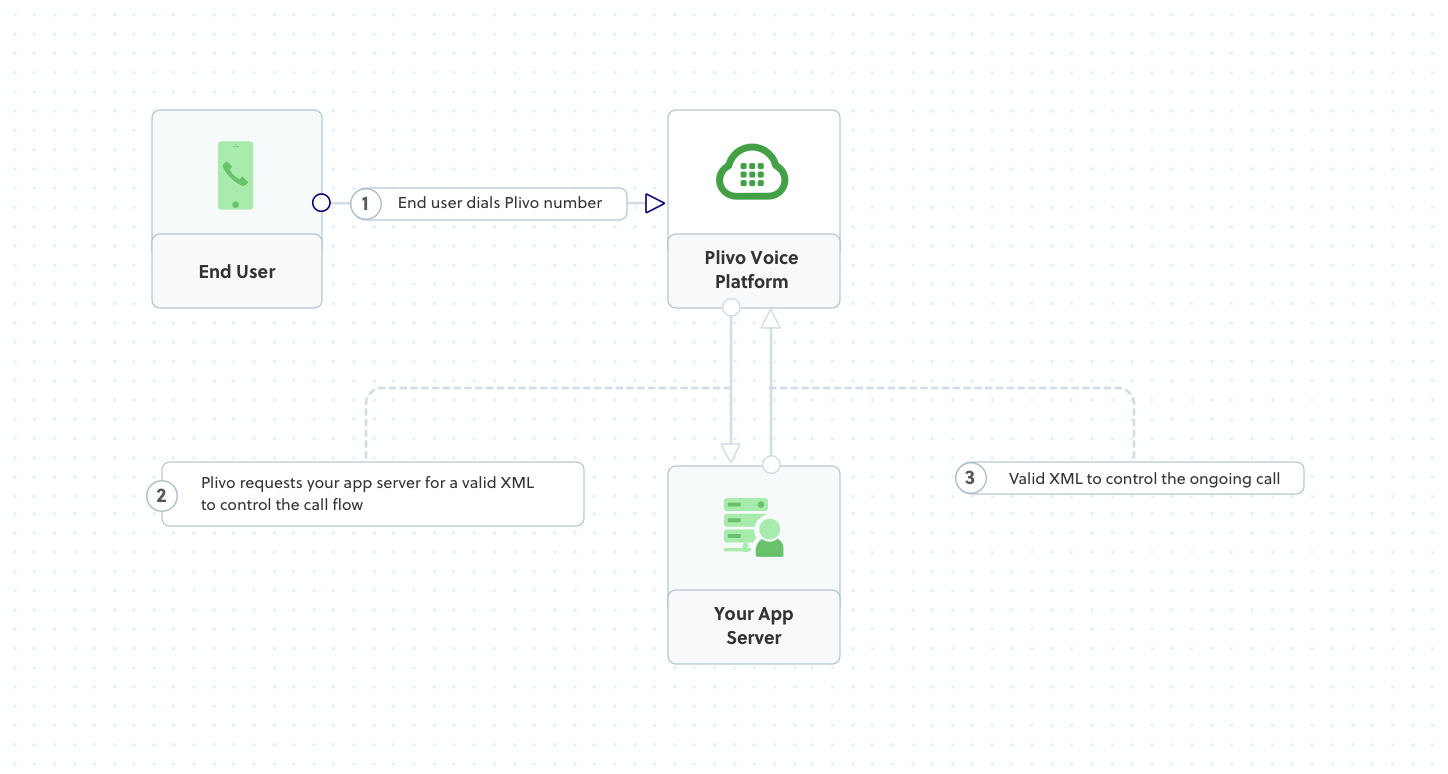
Plivo requests an answer URL when it answers the call (step 2) and expects the file at that address to hold a valid XML response from the application with instructions on how to handle the call. In this example, when an incoming call is received, Plivo’s text-to-speech engine plays a message using the Speak XML element.You must have a voice-enabled Plivo phone number to receive incoming calls; you can rent numbers from the Numbers page of the Plivo console, or by using the Numbers API.Create a Django app to handle incoming calls
Change to the VoiceProj directory and create a Django app to handle incoming calls.$ python manage.py startapp receivecall
receivecall/views.py and paste into it this code.from django.conf import settings
from django.http import HttpResponse
from django.views.decorators.csrf import csrf_exempt
from plivo import plivoxml
@csrf_exempt
def receivecall_response(request):
# Generate a Speak XML document with the details of the text to play on the call
response = (plivoxml.ResponseElement()
.add(plivoxml.SpeakElement('Hello, you just received your first call')))
return HttpResponse(response.to_string(), content_type='text/xml')
Add a route
Create the file receivecall/urls.py and paste into it this code.from django.conf.urls import url
from . import views
urlpatterns = [
url(r'^$', views.receivecall_response, name='receivecall'),
]
VoiceProj/urls.py and paste into it this code.from django.conf.urls import include, url
from django.contrib import admin
urlpatterns = [
url(r'^outboundcall/', include('outboundcall.urls')),
url(r'^receivecall/', include('receivecall.urls')),
url(r'^admin/', admin.site.urls),
]
$ python3 manage.py runserver
Expose your local server to the internet
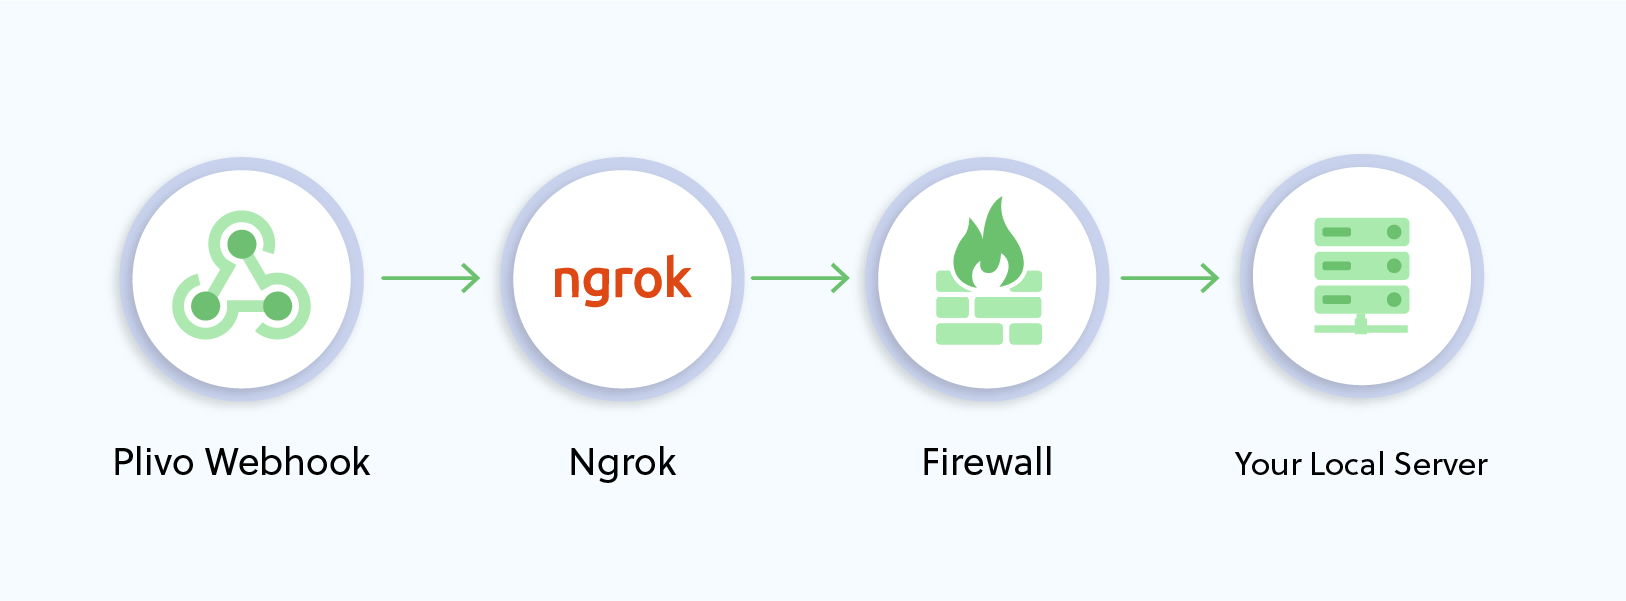
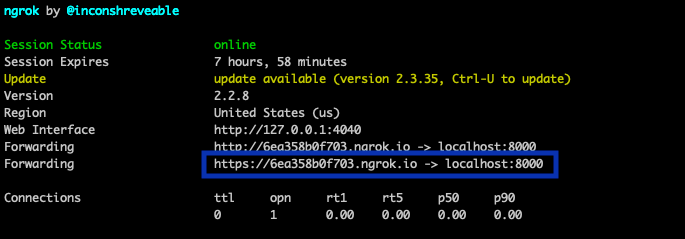
To receive incoming calls, your local server must connect with Plivo API services. For that, we recommend using ngrok, which exposes local servers running behind NATs and firewalls to the public internet over secure tunnels. Using ngrok, you can set webhooks that can talk to the Plivo server.Note: Before starting the service, add ngrok in the allowed hosts list in the settings.py file in your project.
ALLOWED_HOSTS = ['.ngrok.io']
Create a Plivo application to receive calls
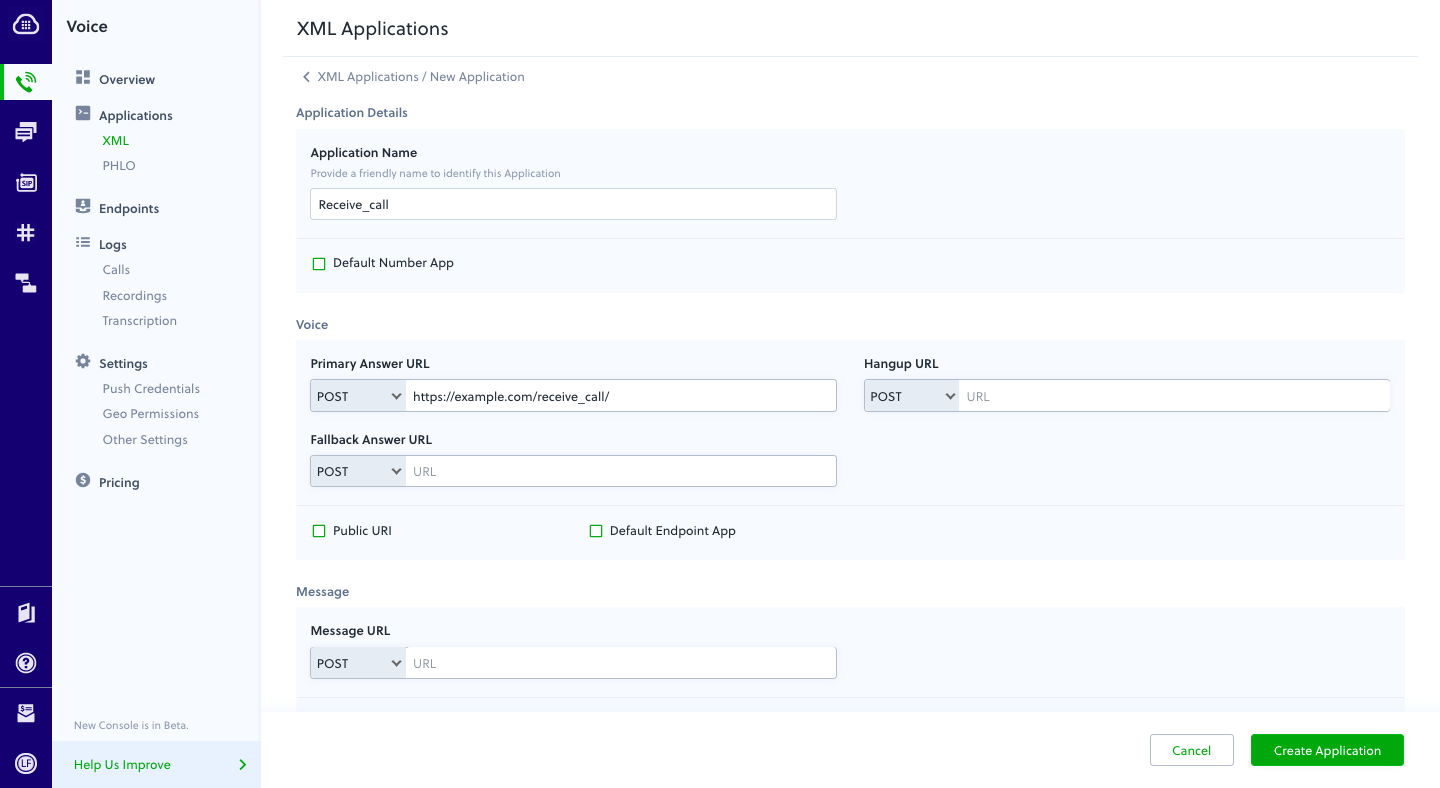
Associate the Django app you created with Plivo by creating a Plivo application. Visit Voice > Applications and click Add New Application. You can also use Plivo’s Application API.Give your application a name — we called ours Receive_call. Enter the server URL you want to use (for example https://<yourdomain>.com/receive_call.php/) in the Primary Answer URL field and set the method to POST. Click Create Application to save your application.Assign a Plivo number to your application
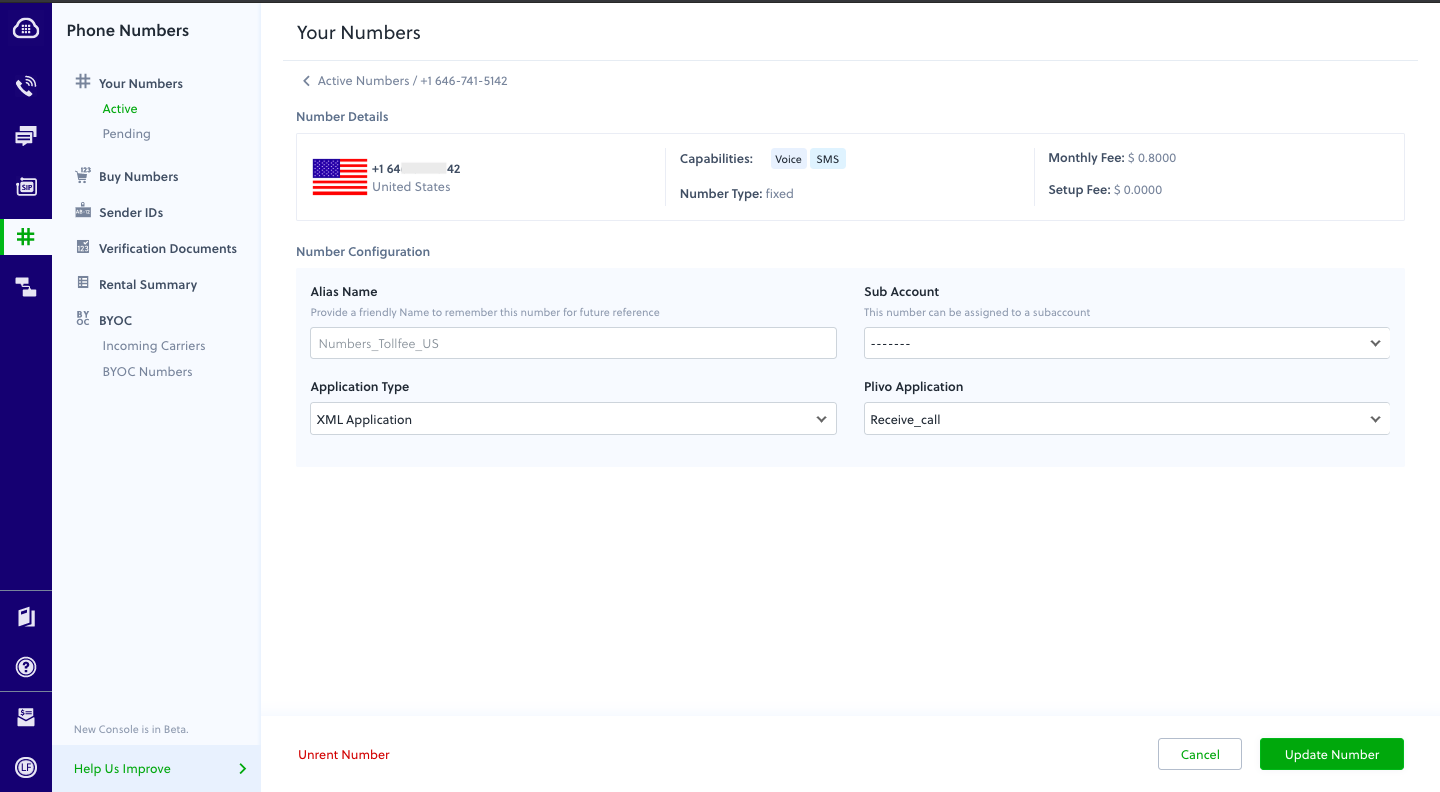
Navigate to the Numbers page and select the phone number you want to use for this application.From the Application Type drop-down, select XML Application.From the Plivo Application drop-down, select Receive_call (the name we gave the application).Click Update Number to save.Test
Make a call to your Plivo number using any phone.Forward an incoming call
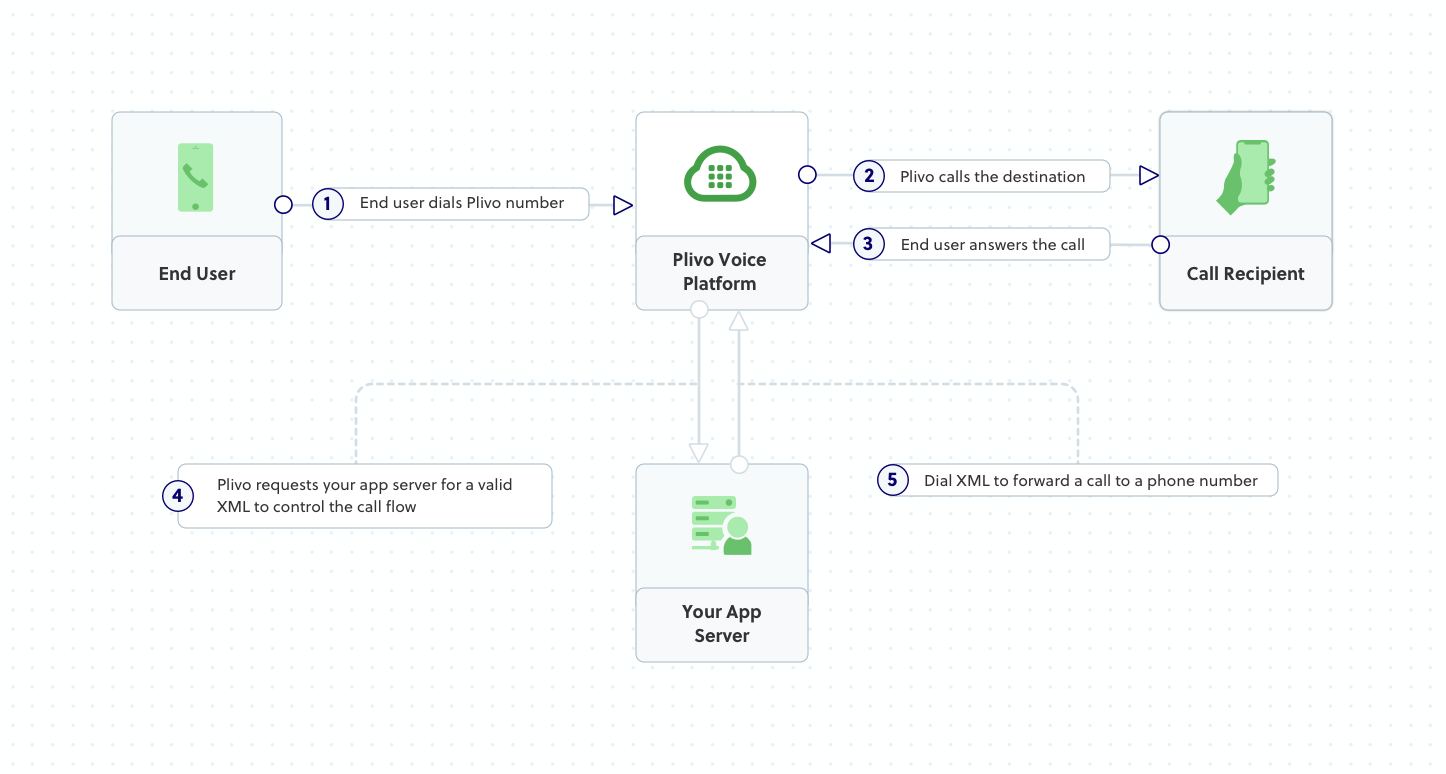
Plivo requests an answer URL when the call is answered (step 4) and expects the file at that address to hold a valid XML response from the application with instructions on how to handle the call. In this example, when an incoming call is received, Plivo forwards the call using the Dial XML element.You must have a voice-enabled Plivo phone number to receive incoming calls; you can rent numbers from the Numbers page of the Plivo console, or by using the Numbers API.Create a Django app to forward calls
Change to the VoiceProj directory and create a Django app to forward incoming calls.$ python3 manage.py startapp forwardcall
forwardcall/views.py and paste into it this code.from django.conf import settings
from django.http import HttpResponse
from django.views.decorators.csrf import csrf_exempt
from plivo import plivoxml
@csrf_exempt
def forwardcall_response(request):
# Generate a Dial XML forward the incoming call.
response = plivoxml.ResponseElement()
response.add(
plivoxml.DialElement().add(
plivoxml.NumberElement('<destination_number>')))
return HttpResponse(response.to_string(), content_type='text/xml')
Add a route
Create the file forwardcall/urls.py and paste into it this code.from django.conf.urls import url
from . import views
urlpatterns = [
url(r'^$', views.forwardcall_response, name='forwardcall'),
]
VoiceProj/urls.py and paste into it this code.from django.conf.urls import include, url
from django.contrib import admin
urlpatterns = [
url(r'^outboundcall/', include('outboundcall.urls')),
url(r'^receivecall/', include('receivecall.urls')),
url(r'^forwardcall/', include('forwardcall.urls')),
url(r'^admin/', admin.site.urls),
]
Create a Plivo application to forward calls
Associate the Django app you created with Plivo by creating a Plivo application. Visit Voice > Applications in the Plivo console and click on Add New Application, or use Plivo’s Application API.Give your application a name — we called ours Forward Call. Enter the server URL you want to use (for example https://<yourdomain>.com/forward_call/) in the Answer URL field and set the method to POST. Click Create Application to save your application.Assign a Plivo number to your application
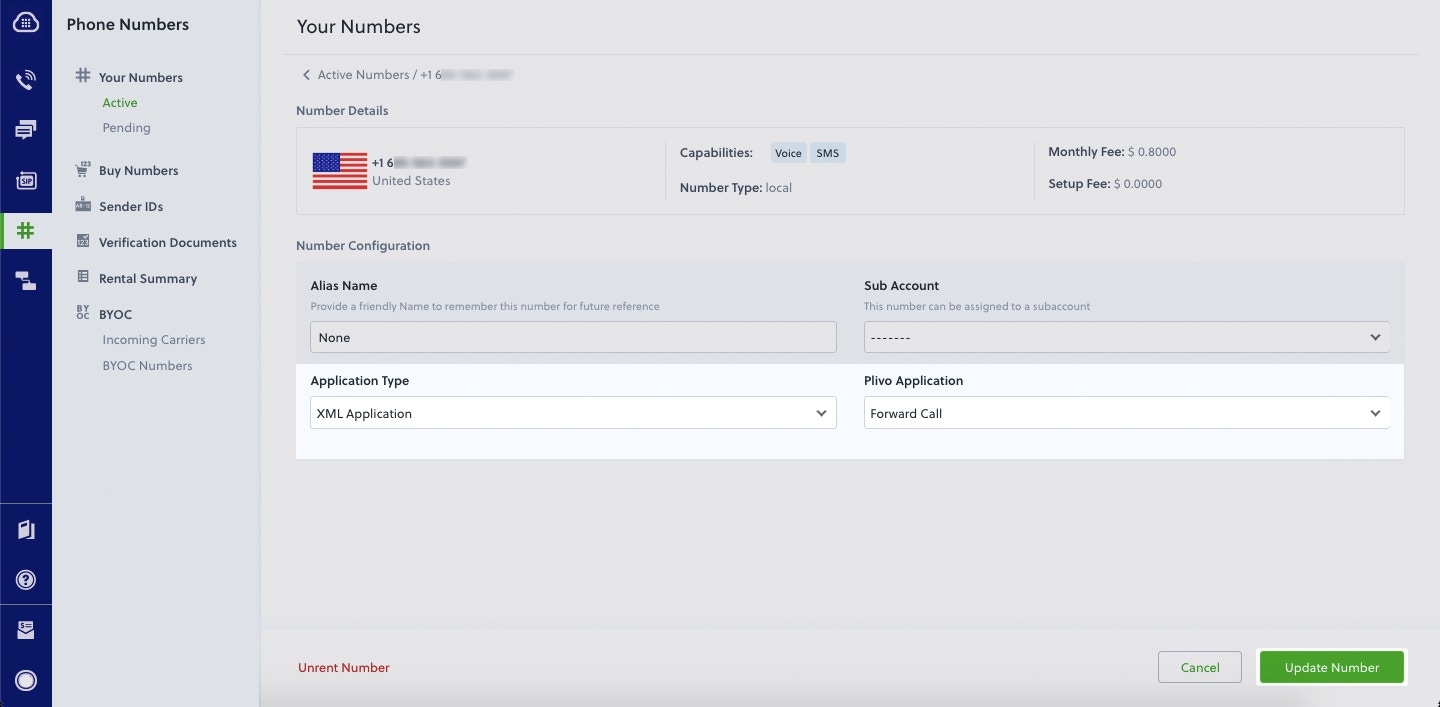
Navigate to the Numbers page and select the phone number you want to use for this application.From the Application Type drop-down, select XML Application.From the Plivo Application drop-down, select Forward Call (the name we gave the application).Click Update Number to save.Test
Make a call to your Plivo number using any phone. Plivo will send a request to the answer URL you provided requesting an XML response and then forward the call according to the instructions in the XML document the server provides.More use cases
We illustrate more than 20 use cases with code for both API/XML and PHLO on our documentation pages.